Zieglers

Just little about C#, .NET, SQL Server, SharePoint and SAP

A controlled experiment: All the possible errors you can get while configuring BCS.

Posted by zieglers on October 26, 2014

Error #1: Message from External System: Login failed for user

  • Scenario: Adding SQL Server connection in SharePoint Designer
  • User: Contoso\designer1
    • AD: Member of Contoso\SP_Designers security group
    • SP: Has “Design” permissions on SharePoint site
    • DB: No permissions

Error message: Message from External System: Login failed for user …

Reason: User has no Server Level public permission on database server.

Resolution: Grant public permissions for user on database server level.

Error #2: Cannot connect to SQL Server database defined in data source connection <dbname>

  • Scenario: Adding SQL Server connection in SharePoint Designer
  • User: Contoso\designer1
    • AD: Member of Contoso\SP_Designers security group
    • SP: Has “Design” permissions on SharePoint site
    • DB: Server level public permission

Error message: Cannot connect to the LobSystem. Cannot open database <dbname> requested by the login. The login failed.

Reason: This one is actually pretty self-explanatory. User has no database level permissions.

Resolution: Grant desired permissions for user on database level, say Read permission.

Error #3: Access denied by Business Data Connectivity

  • Scenario: Adding SQL Server connection in SharePoint Designer
  • User: Contoso\designer1
    • AD: Member of Contoso\SP_Designers security group
    • SP: Has “Design” permissions on SharePoint site
    • DB: Server level public permission, Database level read permission

Error message: Access denied by Business Data Connectivity.

Reason: User has no permissions to connect and consume from Business Data Connectivity Service Application (BCS)

Resolution:

  • Go to Central Admin site
  • Manage Service Applications
  • BCS Service Application
  • Set Metadata Store Permissions

  • Grant Edit permissions for user


Result: SQL Server connection added successfully.

Error #4: Access denied by Business Data Connectivity

  • Scenario: Accessing External List in SharePoint site
  • User: Contoso\bcs1
    • AD: Member of Contoso\SP_BCS_Users security group
    • SP: Has “Contribute” permissions on SharePoint site
    • DB: no permissions

Error message: Access denied by Business Data Connectivity.

Reason: User has no permissions to connect and consume your External Content Type from Business Data Connectivity Service Application (BCS)

Resolution:

  • Go to Central Admin site
  • Manage Service Applications
  • BCS Service Application
  • Select your External Content Type
  • Set Object Permissions

  • Grant Execute permissions for user


Result: User can view external list data successfully.

Note:

Although Error #3 and Error #4 are the same generic error, their resolution are different. In Error #3, user is trying to modify BCS service application itself, maybe creating an external type, rather then consuming it. On the other hand, Error #4 is a result of end-user trying to consume, i.e. execute the already created external content type. Also it’s important to make note of the different of user roles in each scenario.

  • Set Object Permissions is usually for end-users or groups, i.e. data consumers.
  • Set Metadata Store Permissions is usually for SP Designers or SP Admins, i.e. external content type creators/modifiers or SP Admins.

SP Designers -> Edit

BCS End-Users -> Execute

Error #5: External Content Types are not available. Contact your system administrator.

  • Scenario: Creating External List in SharePoint site
  • User: Contoso\designer1
    • AD: Member of Contoso\SP_Designers security group
    • SP: Has “Design” permissions on SharePoint site
    • DB: Server level public permission, Database level read permission on LOB database

Error message: External Content Types are not available. Contact your system administrator.

Reason: External Content Types are not selectable in clients for current user.

Resolution:

  • Go to Central Admin site
  • Manage Service Applications
  • BCS Service Application
  • Select your External Content Type
  • Set Object Permissions

  • Grant Selectable in Clients permissions for user

Result: External Content Type is selectable in client, SharePoint site.

Error #6: <your BCS error goes here…>

  • Scenario: <scenario>
  • User: <username or type>
    • AD: <user’s AD permissions>
    • SP: <user’s SharePoint permissions>
    • DB: <user’s Database permissions>

Error message:

Reason:

Resolution:

Result:

That’s it for now. Hope this post helped you to resolve your BCS error. If your error message is not one of the above, please let me know, I’ll try to tackle it for you. Ok, waiting, next error?

zieglers

Posted in SharePoint | 2 Comments »

Your Ultimate BCS Guide – Notes from a weekend road trip

Posted by zieglers on October 26, 2014

Well, I admit, there are many BCS articles, how-to guides, videos, To-Do’s, Not-To-Do’s out there. What’s gonna be so different with mine? At this point I don’t know, but I’m hoping as I type through something useful comes up.

I have looked at and followed so many of those ‘step-by-step’ articles, and honestly they are all good and well, but with most of them, I felt like they were rushing to get to the destination, rushing to make it work.. That time, you keep getting different errors and finally another F5 and you finally see the results from your test ‘Employee’ table. Yes, we’ll get there too, however, in the post, I wanna delay that Finally-Successful-F5 pleasure a little bit.

In our BCS journey, or maybe I should just say.. road trip.. We’ll have different passengers in the car riding with us at different times of the road trip.

Starting Point: InsanityVille

Final destination: The Great Township of BCS-Saints

Distance between: Toootally depends on you…

Now that we are all packed and ready to go, we are setting off with two old-time pals: AD Admin and DB Admin. Before we hit the road maybe I should probably mention that your car is a *brand new* SharePoint 2013 VM environment and you are NOT the-one-and-only driver of your fancy car – SP Admin. That’s a loooong trip, of course you’ll get tired and sleepy, so at times you’ll need to share the driver seat with Ms. SP Designer and Ms. BCS User. That being said, you’ll pick them up from some other towns on the way. We’ll meet those lovely ladies when time comes. For now, as I mentioned, we are setting off with our two grumpy old friends, AD Admin and DB Admin.

Chapter-1: Every road trip needs a Mr. AD Admin

Early in the morning, still chilly, yet you managed to get up and get out of the door and there are your friends already waiting for you outside… And yes, they are grumpy as usual. For some reason they always are. But that’s not our point in this post. You think to yourself already: Oh God! That’s gonna be one heck of a looong day… Oh yeah! It will.

You unlock the car, Mr. AD Admin takes the front passenger seat and DB Admin is still sleepy, he wants to sleep a little bit more on the back seat. No problem. Bags in the trunk, all set, go! First, stop, of course, coffee stop. Who goes on a road trip without Timmys. Our old friend Mr. AD’s all-time favorite is, yes, you guessed it, XL triple-triple..

Rule #1: Don’t ever demand anything from Mr. AD before he gets his morning coffee.

Shoot! You need a great favor from him. Whose gonna create all those service accounts, users and groups for you? Of course, he will. Maybe you buy the coffee today. At the end your AD Shopping List is full of stuff. Let’s see what’s on that list:

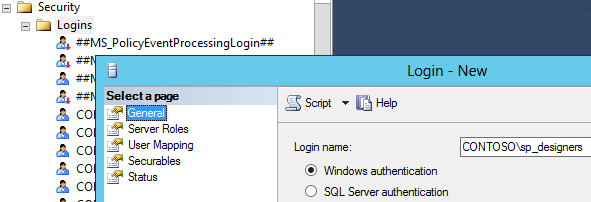
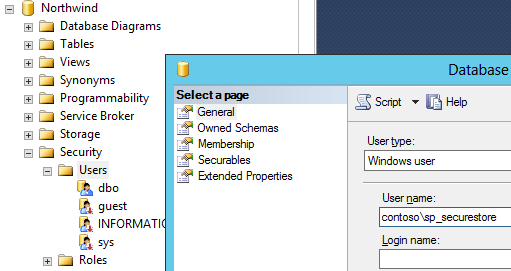
  • SP_SecureStore Impersonation Account: This is the user account which holds the key to your test Northwind or AdventureWorks database. Make no mistake, this is NOT the service account which runs the Secure Store service application. We can call that fella, SP_Services. As far as this road trip is concerned, he is nowhere in the picture. The name of our key-maker is Mr. Contoso\sp_securestore.


  • SP_Designers group: Those are the lovely SP Designer ladies, whose job is to use SharePoint Designer in order to create External Content Types and External Lists, along with other content updates. Do they even need to login to your SharePoint site? Not really… Imagine, all they see and love is SharePoint Designer but nothing else. What are their names? You only remember one: Ms. Contoso\designer1. That’s good enough for now.


  • SP_BCS_Users group: Those are another lovely group of ladies, hmm… Say HR ladies. They will be using your beautifully crafted SharePoint HR portal to access *external* Employee list. All they have is HR Portal SharePoint site, and they have only Contribute permissions to that site. Our beloved business end-users. Oh, but you gotta be careful. If they see an error, they can easily make a BIG fuss about it and next thing you know, as SP Admin, you have 50 emails in your inbox in less than 5 mins. So, you gotta make sure those ladies are happy. I mean “really” happy! Especially, Ms. Contoso\bcs1.

Now that, Mr. AD got his morning coffee, you lay out your big “favor”. Yes, you ask TOO MUCH from him:

  • 2 user groups: SP_Designers, SP_BCS_Users
  • 3 user accounts: SP_SecureStore, BCS1, Designer1
  • … also asking to make BCS1 and Designer1 a member of SP_BCS_Users and SP_Designers respectively.

You exactly now what kinda attitude you’ll get from him, but you know in the end it’s worth it. The fact that he got the first sip of his morning coffee, he replies “No, problem! But you owe me big time…”

Phew… That was easy… Didn’t go as bad as you expected. Could have been much worse like last time. Yeah that time just before spinning a new SP farm, you asked all those service accounts to be created. U remember that time? Such a disaster! You were lucky you didn’t get a black eye. But those days are long gone now. Your farm is up and running, ticking like a clock. But no one still forgets that big fight with Mr. AD over asking “Replicate Directory Changes” permission for Mr. Contoso\SP_UPS. Ok, ok.. Back to our road trip… J

It hasn’t been long, but we already reached Mr. AD’s destination. He had his triple-triple, he’s happy. You got your AD groups and accounts you needed, so you are happy… You pull over and let Mr. AD get off the car. Mr. DB Admin has been awake like for the last 5-10 mins, so he takes the passenger seat after Mr. AD’s happy departure. Right on!

Chapter-2: An unexpected hitchhiker: Ms. SP Designer

You guys are kinda best friends so it’s OK to have demands from each other. But you know Mr. DB Admin’s nature, he’s a little conservative when it comes to db permissions. Although you know you’ll get what you ask, better not push it. Say if you ask for db_owner, the most you can get can be a db_writer. But you know that already, so no problem. You guys are still best friends. Forever? Time will tell.

Off you guys go… Not long after, you come across a hitchhiker. You have a short debate with Mr. DB on the topic of To-Stop and Not-To-Stop. In the end, you decide to stop. She hops in.

After couple of mins intro chit-chat and next thing you know she is an SP Designer, whose job is to design and modify company’s HR Portal. She usually gets calls from HR manager on how to change the content but once in a while she gets some specific demands. She says she heard lots about External Content Types and External Lists, never tried herself. She remembers though, some other colleagues of hers, trying and failing, endless times… Like literally, endless times… She heard the infamous rumors about it. But she likes challenge in life. One of her biggest desires in this life now is to create an External Content Type with absolutely zero errors encountered while adding the SQL Server connection to her external content type. Based on her reckoning, this is the part most people lose it and totally go insane. She doesn’t wanna go insane and asks you, the very SP Admin, for help.

Can you do this SP Admin? Do you have what it takes to create an External Content Type with absolutely zero errors encountered? Only time can tell… But guess what, you already tried yourself million times and yes after failing million times, you know how to do it. Knowing is something else, being able to explain it properly is totally something else. He knows that… And imagine, explaining this while driving? But who cares, she’s cute! Mr. SP Admin will try his best, no matter what!

One eye on the mirror, SP Admin starts explaining it to Ms. SP Designer:

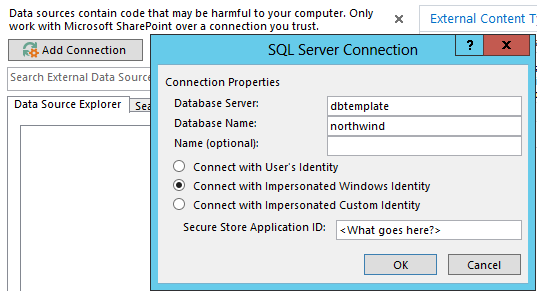
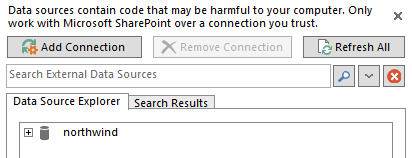
So, you know, you connect to your HR Portal site. Then, there is a link there on the left, saying External Content Types, you click there. On the main area, you type the name and description of your ECT, you know, same as usual. “Then, what?” asks SP Designer. Then, is the most exciting part of creating an external content type. Connecting to an external data source, most likely your SQL server.

Ha, ok! But what a minute, won’t I need access to that data source. I mean to SQL Server itself and then to HR database. “Yes, you will” says SP Admin, by turning to his so-called best friend Mr. DB Admin sitting quietly next to him in the passenger seat.

Chapter-3: Every SP Admin needs a best-friend! Better be a Mr. DB Admin

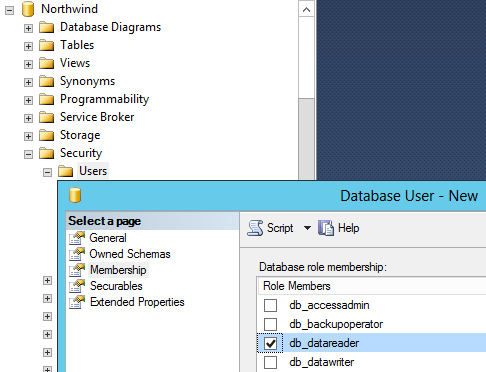
Now it’s Mr. DB’s turn try to impress the cute Ms. SP Designer. He opens his mouth and spills it out at once. Firstly, you’ll need to be able to login to db server. This needs to be granted on Server level security. All you need is public permissions.

But I need to access HR database, says her impatiently. I know… Then we’ll have to give you only read permissions on HR database. But we are sorry, we cannot give you more than Read permissions, since all you have to do is to read the schema details and create your external content type.

Somewhat satisfied and puzzled, she turns to SP Admin. “So, that’s it? That’s all I need?” “For now, yes!” But, don’t you have to do something before this? What about Secure Store Application ID? What is she gonna put there when asked?

Chapter-4: Guess, we need a Secure Store Application now.

So, what good is an SP Admin if he cannot create and configure a proper Secure Store Application for Ms. SP Designer? Oh, that’s easy… All she needs a group type Target Application.

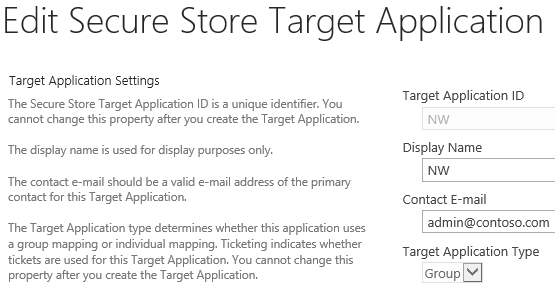
Then put a meaningful prefix to windows user name and password fields, so when time comes, you can remember which credentials to provide. And that time will come very soon.

Then, provide the big boss as your target application admin. Now, slow down right here! Members? Hmm… What could that be? Well, those are the lovely HR ladies we mentioned before. People who will access your test database with the help of impersonated account, Mr. contoso\sp_securestore. All that employee table data, which will be only accessible by HR ladies. Not SP Designers, not nobody!

Who plays the hero here? That’s our one and only Mr. SP_SecureStore account. He’s the one who gets his hands dirty. He’s the one going down into deeps of database table and grabbing that data for you. He’s the one who will need access to test database as well. HR ladies will just pull the strings, and Mr. SP_SecureStore account will get the data for ’em. How? Coming soon…

So, when are we entering SP_SecureStore credentials, so that Secure Store service application keeps it somewhere safe and cozy? Right at this moment. This is the one time SP Admin will set the credentials for that target application and it’ll be secure for good.

Now, SP Admin sees why he had to put the prefix while creating the target application. Wink wink!

Job done, thinks SP Admin. All good and well. Let’s back to our cute Ms. SP Designer. SP Admin explains all that to her while driving, but still keeping his eyes on the road strictly. He thinks she gets it. Maybe all of that is a little TMI for her as well, who knows? Actually who cares? All she cares is if it’s gonna work or not.

Chapter-5: Back to SharePoint Designer

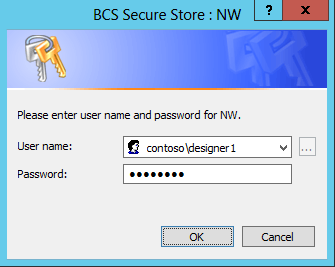
Now she knows what to put in that last textbox, Secure Store Application ID. That’s the ID of the target application Mr. SP Admin just fictitiously created while driving and passed on her, delivered to back seat with a sharp look from the mirror. So, it must be “NW”, then. Let’s try.

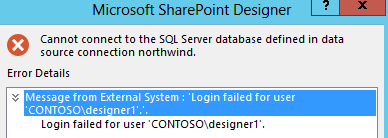
Hmm, getting challenged again. SP Designer enters her credentials and look what happens.

Oooppsss.. What’s that now? Who is to blame for ruining Ms. SP Designers dreams of creating External Content Type with zero errors encountered.

<Here comes a looooong honking!> SP Admin gets back to himself. He thinks he slightly fell asleep while driving. Wow! What a nightmare he saw in that couple of seconds. He thinks again and remembers. Of course BCS! How is Ms. SP Designer will be able to access BCS Service Application is she has no such permissions granted by me. How silly of me?

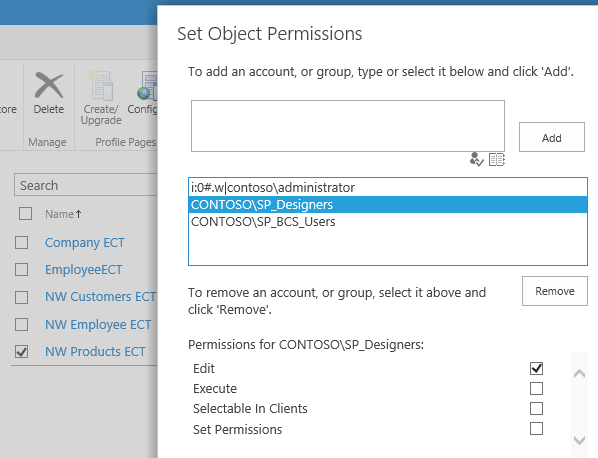
Off he goes to BCS in Central Admin, and provides the BCS Metadata Store permissions for her. But which ones? Well, since she’s creating external content type and external list, she just needs to edit stuff, so let’s give her only edit permissions.

Now, that must be it! With a confident voice, SP Admin tells her to try now. See what happens? There she tries it. And there it is… She got through for the first time, without any errors.

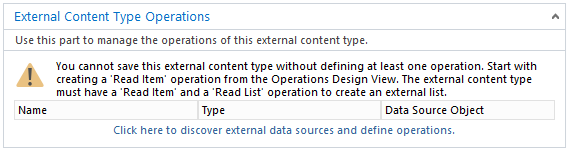
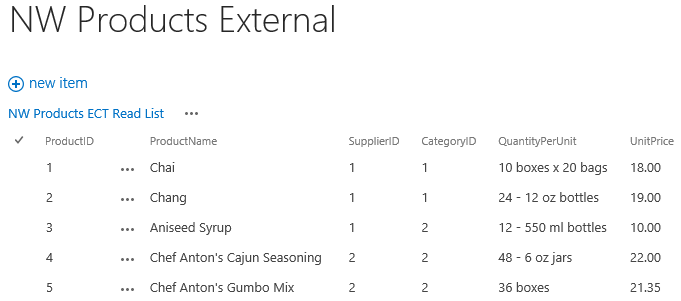
Rest is like a walk in the park. Select the table, list operations you want and follow the wizards and there you have your first External Content Type created.

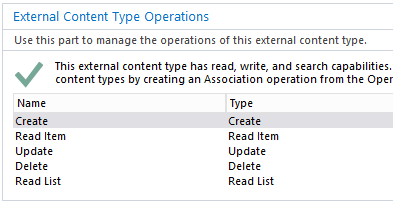
Then she creates an External List by having recently created external content type selected. Since HR Manager wanted Employee list, so be it.

She thinks her job must be done by now. They also just arrived to the town she wanted to go, so perfect time. All farewell to Ms. Cute SP Designer, off she goes to her next journey. Did SP Admin forget to get her number? Of course, he didn’t. After all that help and making her dreams come true, SP Admin way deserved that phone number, don’t ya think? J

As soon as she left the car, our conservative best friend Mr. DBA had to mention. So, what’s gonna happen to her credentials on the server and database? I’m sorry old friend, but I have to revoke them. So be it, says Mr. SP Admin with the satisfaction of getting cute SP Designer’s phone number. Do it! She no need ’em any longer.

There Mr. DBA revokes all her permissions from SQL server and test database, like she never existed before. Better be safe than sorry, says he, afterwards, with a smirk on his unshaved face.

“Now what?” says SP Admin to DBA.

“You think after all that configuration SP Designer did, can HR Manager (contoso\bcs1) access Employee table data through Employee External List successfully?” But before answering that, they gotta have a hearty lunch.

Chapter-6: Didn’t we forget something?

I think you did. Mr. DBA already removed her db permissions both, server and database level, however you didn’t. Yes, that Metadata Store permissions you granted on BCS. Assuming she’ll never come back again, do you think she still needs that Edit permissions. Don’t think she does. So, let’s revoke that too and keep it clean.


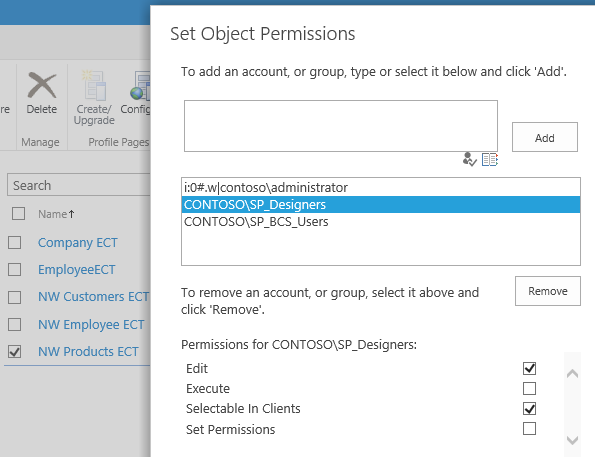
Now, back to HR Manager, do u think she has everything she needs to see the external list data properly? I think the group created for her business users, SP_BCS_Users, need to be added her, just like we did for SP Designers too. Otherwise how can they communicate to external list data through BCS Service Application? So, let’s add that group here too and give HR Manager a shout to see what happens.

But hang on a minute! They don’t need to Edit the external content type nor the external list. They don’t work with SP Designer. Then they don’t need the same Edit permission we granted to SP Designers. They just need to Execute it.

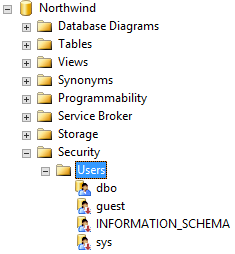
Now, I’ve done my part, but Mr. DBA, don’t u forget something too? What about that one and only account which will have access to databases, contoso\sp_sercurestore account? Hmm… You might be right. So, let’s first add that one to SQL Server as simply public.

Then grant the READ and/or WRITE permissions on test database, Northwind.


But why Read and Write, asks Mr. DBA as you would expect from him. It’s easy to answer this one for SP Admin. If HR Manager/Users want to make modifications on Employee data, they will also need Write permissions on test db, along with Read permissions.

As long as you give a logical answer to Mr. DBA’s questions, he’ll be ok and you’ll get whichever permissions you need from him.

Chapter-7: Moment of Truth!

So, that’s it, then! This time we are really done. What’s gonna happen now when HR users try to access Employee external list? Shall we see, or is it still too early, are we still missing this and that? Moment of truth… Fingers crossed.

[In the meantime, somewhere out there some HR user tries to access the external list in HR Portal and …]

Tataaaa… It works! Wow, that was hell of a road trip. But hang on, we are still on the road… It’s just after lunch. I think we are just getting warmed up!

Stay tuned for Mr. SP Admin’s next adventures…

Coming up – A controlled experiment: All the possible errors you can get while configuring BCS.

Zieglers

Posted in SharePoint | Tagged: , , , , , , , , , | Leave a Comment »

SharePoint 2013 – Automated 3-Tier Farm Parallel Deployment

Posted by zieglers on January 2, 2014

Hmm… Where to start? It’s been so long since i wrote my last blog post so I forgot what I used to use for intro paragraphs.. Maybe i should say “Long time, no blogging..”

Anyway, back to our topic.. Recently i was working on a SharePoint 2013 environment setup, where you do the classics, such as provisioning DEV, QA, and PROD environments. It was a very sophisticated piece of hardware where I was using vSphere 5 to manage the hosts, VMs, LUNs, etc. It was an amazing learning curve for me and made me realize once again while working with SharePoint at the application layer, actually how much we are missing or taking things granted happening on the infrastructure level.

Ok, enough powder puff.. This time really back to our topic.. In this post, I’ll try to walk you guys through a scenario where we’ll try to deploy/configure a 3-Tier SharePoint 2013 farm in an unattended-automated-parallel fashion. So what does that really mean? Sounds like a sales quote, but actually it’s really possible. I could even exaggerate it a little by saying “almost one-click“, but i won’t go that far for now. My intention is to showcase a scenario as follows:

  • 2 DB server, 2 APP servers, 2 WFEs
    • OS: Windows Server 2012
    • DB: SQL Server 2012 SP1 Enterprise
  • DB servers are clustered (if not we can get there in the following posts)
  • SQL Server 2012 AlwaysOn will also be used for HA and DR
  • AutoSPInstaller will be used for parallel automated installation
    • Getting this to work error-free with your environment is most of the work, believe me. By now, I think i know thousand ways of not building a SharePoint farm properly.

Preparing Topology for Automated Deployment

It’s important to mention that AutoSPInstaller won’t do all the magic for you, although it’ll handle most of it quite smoothly. One of the first things to do is to prepare your topology accordingly so that AutoSPInstaller can run error-free. At this point, assuming that your servers will be hosted by VMs, we need to get all servers – DBs, Apps, WFEs – to a point that all prerequisites are installed and configured properly, before running the automated parallel deployment scripts. This is also the time you get a snapshot of all servers and maybe call it “Starting Image”. This will allow you to go back and launch the installer again and again w/o worrying about preparing the servers from scratch.

Preparing OS Template

For production environment, chances are your DBs will be clustered. For my setup, I also took advantage of SQL Server 2012 AlwaysOn Availability Groups. Will also try to give details on that in another post. But for now, here is how DBs look like:

1 - DBServer.Summary

Disable Enhanced Security Configuration. (scripted)
Disable the Windows Firewall. (scripted)
Enable Remote Desktop for your VM. (scripted)
Configure the local Administrator account so the password never expires. (scripted)
NOTE: Detailed instructions are here: Preparing.Servers
(Optional) Configure the Windows Update settings.
(Optional) If you have a Windows Server 2012 product key, activate the Windows operating system.

Here is the “Preparing OS-Template” PowerShell script: Preparing.OS.Template

2 - PowerShell.Disable.IE.ESC

Also make sure that .NET Framework 3.5.1 is installed. To do this run the following command using PowerShell:

dism.exe /online /enable-feature /all /featurename:NetFX3 /Source:D:\sources\sxs

9 - Install.DotNetFX35

Above first four PowerShell scripted steps should be good to go to prepare our OS-Template VM. Optionally you can configure Windows Update settings and activate the Windows OS. Once done, take a snapshot of this VM and call it “OS-Template“. Going forward this will be our first base and any other VM templates will be cloned from this one, such as DB-Template or SP-Template.

3 - OS.Template.Snapshot

Preparing DB Template

Now that you have your OS-Template snapshot, you can easily convert it into a template VM. Here is a quick definition of what a VM Template is.

8 - What.is.VM.Template

Go ahead and spin another VM using OS-Template. This will be your DB-Template VM.

Now you can install SQL Server 2012 SP1. Feel free to install with default settings either using UI or unattended installation. SQL Server 2012 AlwaysOn does not require SQL instances to be clustered, so when we configure AlwaysOn in the following posts, default instances will work just fine.

10 - SQL.Instance.Features

Note that still this VM is not joined to the domain, no service account are created, …etc since currently we are just configuring individual VM templates. Once we clone from these templates to create our 3-tier farm topology, then all VMs will be joined to the domain, we are not there yet..

Configure the Named Pipes protocol using the SQL Server Configuration Manager.
Max. Degree of Parallelism set to 1.

11 - SQL.Enable.Named.Pipes

11 - SQL.Max.DegreeOfParallelism

Above is just a couple of items to set before we save this VM as our DB-Template. Once they are done, shut down your VM and take a snapshot called “DB-Template“.

13 - DB.Template.Snapshot

Now, we are done with our DB-Template. Go ahead and convert this snapshot to VM Template and spin 2 DB VMs from it. Those identical DB VMs will be our DB1 and DB2 servers of our topology.

Preparing SharePoint 2013 Template

Using the first OS-Template we created, spin another VM which will be configured as SharePoint template. Both App servers and WFEs will be cloned using this template. Here the idea is to install in advance:

  • SharePoint prerequisites
  • SharePoint binaries
  • SharePoint Cumulative Updates and hotfixes

We’ll use AutoSPInstaller to take care of it, simply with one-click. Now it’s time to jump to AutoSPInstaller topic and see how to structure it. Here i’m not gonna go into details of Input.xml and its options. Simply i’m trying to get above installed to create a template. Remember, we are not deploying and configuring the farm now. We are just trying to get SP binaries installed.

We could have easily left this part to AutoSPInstaller while performing parallel installation but believe me, the amount of time you’ll save by doing this in advance is simply priceless.

AutoSPInstaller

You can get AutoSPInstaller from CodePlex: http://autospinstaller.codeplex.com/

1. Copy SharePoint binaries under SharePoint folder.

15 - AutoSPInstaller.SP.Folder

2. Copy all the prerequisites installer files under PrerequisiteInstallerFiles folder under SharePoint folder.

In order to download the following prerequisite installer files, you can use the script provided below. Once you download these files, simply copy them to your AutoSPInstaller directory shown below.

http://gallery.technet.microsoft.com/office/Script-to-SharePoint-2013-702e07df

16 - AutoSPInstaller.SP.Preq.Folder

3. Copy .Net Framework 3.5 installer under sxs folder.

17 - AutoSPInstaller.SP.Preq.SXS.Folder

At this point we are almost ready to run AutoSPInstaller to install the binaries. But we need to add this VM to domain now to run AutoSPInstaller. I’ll explain the details of it later. But for now we just want to get binaries installed.

4 - AutoSPInstaller - Installing.SP.Binaries

5 - AutoSPInstaller - Installing.SP.Updates

6 - Add.Remove.Programs

AutoSPInstaller will install all prerequisites, SharePoint 2013 binaries and updates as shown above. Then, it’ll ask you if you want to proceed with farm deployment. Since we are building SP-Template VM right now, we’ll stop here, shut down our VM and take a snapshot, call it “SP-Template“.

7 - SP.Template.Snapshot

Milestone – Topology Template VMs are ready!

Let’s step back for a moment and see what we’ve done so far. Until this point we simply:

Created 3 Template Virtual Machines:

  • OS-Template (Base Template)
    • Windows Server 2012 Standard
  • DB-Template
    • SQL Server 2012 SP1 Enterprise installed
  • SP-Template
    • SharePoint 2013 Enterprise installed, not configured

You can see the above activity performed as your investment for your SharePoint infrastructure. Regardless of how many farms you provision, such as DEV, QA, PROD; now you can use these templates to clone your VMs from.

Provisioning the Production Environment Topology

Now, we are ready to provision our PROD environment. All you have to do now, is to spin:

  • 2 VMS from DB-Template
  • 4 VMs from SP-Template (2 App Server and 2 WFEs)

20 - PROD.Topology

Once you create your VM instances, make sure you add them to your domain, setup local admin passowords, and now you are good to go for the next part, which is indeed where the real action happens – parallel remote SharePoint 2013 farm deployment and configuration.

Before we go back and start talking on how to prepare AutoSPInstaller setup for our topology, let’s figure out our logical architecture and naming conventions.

DB-Servers:

xxxxPRDB001 and xxxxPRDB002

App-Servers:

xxxxPRAP001 and xxxxPRAP002

SharePoint WFEs:

xxxxPRSP001 and xxxxPRSP002

Your naming convention might be different based on your organizational needs. For the rest of the article i’ll refer to above computer names.

Also we need a set of Service Accounts to be created in advance. Those are 2 SQL Server service accounts (sp13prodsqlagent and sp13prodsqlengine) and SharePoint Service accounts as follows.

22 - SP.ServiceAccounts23 - SQL.ServiceAccounts

Adapt AutoSPInstallerInput.XML to your topology

AutoSPInstallerInput.xml file is the heart of farm provisioning and configuration. Once you launch AutoSPInstallerLaunch, it will use this input file to figure out the servers in the topology, which servers have which roles (app or wfe), which server will host central admin, search components, web sites, …etc.

When I was going through this exercise, it took me quite sometime to really understand which attributes to use and how to use them, for an effective 3-tier farm deployment. So, I’ll try to document here as much as i can with the details.

First let’s take a look at root attributes:

21 - AutoSPInstaller.InputXML.1

Things you need to update

  • Install SPVersion
    • PIDKey – provide your own SharePoint 2013 license key
    • AutoAdminLogon Password – provide your SharePoint Setup Account password here. This is the account which will be used to login when server is restarted. Local Admin on all servers, possibly a domain administrator account.

24 - AutoSPInstaller.InputXML.2

  • Farm
    • Passphrase – provide your own SharePoint farm passphrase
    • Domain Name – In username attributes, provide your own domain name. Ex: <Username>MyDOMAIN\SP_Farm</Username>
    • CentralAdmin Provision – provide computernames of your SharePoint WFEs. Ex: xxxxPRSP001 and xxxxPRSP002. Note that there is only space between computernames. No comas, no semi-columns.
    • Database DBServer – provide the alias for your SharePoint instance. Regardless if they are clustered or not, use db alias here. In my case, I enabled SQL Server 2012 AlwaysOn Availability Groups, so I have SP13-AGAP, which my availability group’s access point, which is on port 2001. More to come on that..

25 - AutoSPInstaller.InputXML.3

  • WebApplications
    • Domain Name – In attributes, provide your own domain name.

26 - AutoSPInstaller.InputXML.4

  • ServiceApps
    • This is where we identify  Service Apps Topology. i.e. this is the critical part where we defined which service apps will be provisioned on which servers, such as AppServer1, AppServer2. By default, i’m provisioning all service apps on both AppServers named as PRAP001 and PRAP002.
    • Provision – replace server names with your own app server computer names.
    • StartProfileSync – Note that we are also starting User Profile Synchronization Service. I know, it’s like magic, ain’t it? But best part is – it works!
    • CreateDefaultSyncConnection – this is set to true. We are also creating the a sync connection. For that don’t forget to give appropriate AD permissions to SP_UPS account and provide its password.

27 - AutoSPInstaller.InputXML.5

Before moving to next attribute, it might be good to pause a little here and pay some attention to Enterprise Search Topology settings. You can define which app servers, wfes will run which Search components such as:

  • Crawl component
  • Query component
  • Search Query and Site Settings
  • Admin component
  • Index component
  • Content Processing component
  • Analytics Processing component

28 - AutoSPInstaller.InputXML.6

  • EnterpriseServiceApps
    • Excel Services Provision – replace server names with your own app server computer names.
    • Other Enterprise Service Apps are not provisioned as for this example. If you decide to provision them as well, just make sure that you create their dedicated service account in advance.

29 - AutoSPInstaller.InputXML.7

  • OfficeWebApps
  • AdobePDF

Of course, you don’t need to worry about every single option of this input xml. I just wanted to give some insights to it. I prepared a template input xml which can be tailored to your topology easily. You can get AutoSPInstallerInput-TEMPLATE.xml here: AutoSPInstallerInput-TEMPLATE.XML 

I also prepared a little cmd to be used with FNR tool (find and replace tool, which you can find on CodePlex here). This will help to replace the correct parameters.

AutoSPInstallerInput.FNR.cmd here: AutoSPInstallerInput.FNR

Now it’s time to recap.. Let’s see where we are at now with automation, deployment, and identify what the gaps are to get this environment PROD ready.

Summary

So far, we have 3 VM Templates and 6 Servers (2 DB, 2 App, 2 WFE) as shown below, where all 4 SharePoint 2013 Servers were deployed and configured remotely.

31 - Visio.Topology

In the next post, I’ll try to show how to configure SQL Server 2012 AlwaysOn Availability Groups from SharePoint 2013 content and admin databases.

zieglers

Posted in SharePoint | Tagged: , , , , , , , | 1 Comment »

jGrowl Notifications for SharePoint 2010 – Part 3

Posted by zieglers on September 1, 2011

This article is the third one of “jGrowl Notifications for SharePoint 2010” series. If you haven’t read previous articles, you can find them here:

jGrowl Notifications for SharePoint 2010 – Part1

jGrowl Notifications for SharePoint 2010 – Part2

Also, now SPNotifications is published on CodePlex. Articles above basically explain the details of the initial release.

In this article, I’ll try to show some additional features of jGrowl functionality such as pooling of notifications, different positioning of notification boxes on the screen …etc. In addition to that, you can also find my Load Testing findings for SPNotifications. Results are way better than I expected!

Pooling of Notifications

There is a jGrowl.defaults.pool property which allows you to limit number of notifications shown on the page. Once a notification is closed, next one will be displayed after that. This is a great functionality which prevents notification boxes from crowding your page.

Here it is in action.. Let’s say you have 1000 notifications – titled from 1 to 1000 🙂 Assume that you’ve already read the ones from 3 to 9. In this case having pooling parameter set to 3, you’ll see the following on your page.

Now I close notification #10 above after reading it. You’ll see that notification #11 will appear as soon as you close notification #10 – as seen below.

Load Testing

So far, I’ve tested SPNotifications with 1K and 10K notification items respectively. I used a simple powershell script to bulk-insert items into the list. You can find this script in this post, where I was trying to insert 1 million items to test List Throttling.

I must say as number of items increased, I had to change SPServices call from async false to true. However, this also came with its side-effect which I’ll try to mention shortly.

Firstly there is almost no effect of 1K items while displaying notifications. Notifications are displayed as soon as the page is loaded. On the other hand, from end-users perspective, it doesn’t really matter if notifications are shown right after page loads or maybe 10 seconds later. An end-user is not really waiting for notifications right away after page load. They will show up whenever CAML query execution is complete.

Based on my load tests, which I performed for 3 sets of loads – namely 1K, 5K, and 10K – I can say that notifications were displayed after:

(after page load completes)

1K – less than 1 sec

5K – 2-3 seconds

10K – 8-10 seconds

Also note that default threshold for a list is 5000 items. This makes “2-3 seconds delay” still acceptable..

So, What to do if number of notifications exceed 5K??? Probably i can answer this question with another question: “Do we really need to keep all those ‘Read’ notifications?“. Probably not! One way to keep number of notifications low would be to delete notifications as soon as they are read.

What if some of those notifications are very important and needs to be tracked down later on for some auditing or reporting purpose? In this case, it’d be wise to maybe to add a ‘Importance‘ column to the list. Delete the ‘medium and low importance’ notifications and keep ‘high’ ones.

Basically, this is the area I’ve been thinking to improve and scale out so that all those above and similar questions can be answered. At this point, i’ll stick to one list. We’ll see how SPNotifications will evolve in time.

zieglers

Posted in IT Stuff, SharePoint, SharePoint 2010 | Tagged: , , , , , , | 1 Comment »

SPNotifications published on CodePlex!

Posted by zieglers on August 29, 2011

Finally today, I was able to publish my latest CodePlex project – SPNotifications.

SPNotifications provides floating warning/alert type of notification boxes which can be used to notify your SharePoint users.

Using SPNotifications, you can notify your users by show notification messages such as weather warnings, corporate updates, events …etc.
Notifications can be displayed on any page of your selection, for example, home page of your intranet, or landing pages for each department.

SPNotifications uses jQuery – jGrowl plugin for displaying notifications. Your notifications are stored in a custom list called ‘Notifications’.
Power users or admins can also use a custom application page to populate new notification messages.

You can find all the details on SPNotifications site on CodePlex.

Please give it a try and let me know what you think..

zieglers

Posted in IT Stuff, SharePoint, SharePoint 2010 | Tagged: , , , , , , , , , | Leave a Comment »

jGrowl Notifications for SharePoint 2010 – Part 2

Posted by zieglers on August 22, 2011

This article is the second part of “jGrowl Notifications for SharePoint 2010” series. If you haven’t read the first part of the series, you can read it here.

In the first article, we implemented the infrastructure for “jGrowl Notifications for SharePoint 2010”. From now on, i’ll refer to it as SPNotifications. First version was pretty raw in the sense that it was still using soap envelopes which are really hard to construct and not that practical to use. Also first version was just a teaser and it was missing some business logic too.

What’s in this article?

In this article i’ll try to show how to replace AJAX calls using soap envelopes with SPServices calls.

SPServices is a jQuery library which abstracts SharePoint’s Web Services and makes them easier to use. It also includes functions which use the various Web Service operations to provide more useful (and cool) capabilities. It works entirely client side and requires no server install.”

Once we have a cleaner syntax, we’ll add a simple logic where notifications will be read from a custom list called -you guessed it- Notifications. Also upon closing a notification, we’ll implement a close callback logic which will mark notification as read. That should do it as for the scope of this second article. Further improvements will be explained in future articles of the series.

Implementation

First of all, let’s try to list implementation tasks:

  1. Include SPServices default syntax.
  2. Generate CAML query for AJAX call.
  3. Implement completeFunc details.
  4. Implement MarkAsRead function.
  5. Test it!!!

1. Include SPServices

Inside document.ready include this SPServices call as shown below.

// ***************************************

$().SPServices({
operation: “GetListItems“,
async: false,
listName: “Notifications“,
CAMLQuery: query,
CAMLViewFields: fields,
completefunc: function (xData, status){

} // end – completefunc

}); // end – SPServices

// ***************************************

Operation is GetListItems – since we want to read items from Notifications list.

listName is Notifications – a custom list with additional fields Description, Assigned To and Status (Read, Unread).

Choice values for Status field are ‘Read’ and ‘Unread’. Also, at this point you can add some sample items in Notifications list.

2. Generate CAML Query

Now, we have the skeleton for SPServices call, we can go ahead and specify our CAML query. We want to show only notifications where:

  • Assigned To values is “current user”
  • Status is different from ‘Read’

query‘ variable will store CAML query to be executed. ‘fields‘ variable will have fields that we want to display in the notification.

// ***************************************

var query = “<Query><Where><And><Eq><FieldRef Name=’AssignedTo’ /><Value Type=’Integer’><UserID Type=’Integer’ /></Value></Eq><Neq><FieldRef Name=’Status’ /> <Value Type=’Choice’>Read</Value> </Neq> </And> </Where> </Query>”;
var fields = “<ViewFields><FieldRef Name=’Title’ /><FieldRef Name=’Description’ /></ViewFields>”;

// ***************************************

You can include these variables at the top of the script as shown below.

3. Implement completefunc

This is the part that now we have our results returned and ready to be formatted before displayed. As mentioned in first article too, jGrowl will be used for presentation of notification messages. Here we will be setting some jGrowl options.

Position:

Life:

Sticky:

Close:

Let’s set position and life params at the beginning of completefunc.

Next, we can start looping through each row returned and display them in the format we want. All data returned will be stored in xData.responseXML object.

// ***************************************

completefunc: function (xData, status){

$.jGrowl.defaults.position = “bottom-right”;
$.jGrowl.defaults.life = 10000;

$(xData.responseXML).find(“z\\:row”).each(function() {

// Format your row here…

}); // end – each function

} // end – completefunc

// ***************************************

Here, let’s stop for a minute and think of how to implement a header part of the notification messages saying “Your messages for today” for instance. For that i introduce a flag called firstMessage, which will help us to construct header message by executing the code only once as implemented below. This header has a lifespan of 5 seconds.

Next we start formatting notification messages for each entry in Notifications list. First let’s get notification ID – SPListItem ID – so that we can provide a link to notification. In messageHtml variable, we basically construct the html part for each notification.

Layout is an icon for the notification followed by its title – linked to notification list item – and below its description.

4. Implement “Mark as Read” logic

Almost done for this article! One thing left, which is marking notifications as read upon clicking close button, so that they are not displayed each time page is loaded. This logic is definitely a must. Imagine having SPNotifications for your intranet and assume that notifications are displayed when you visit homepage of your intranet – or any other department landing page. In that case, showing same notifications every time you visit the home page wouldn’t be that nice, as some point it’d get annoying!! Since this is the case, we need to implement a ‘close callback’ logic here to mark notifications as read.

jGrowl has already an option for close callback – as mentioned in section 2 above. So all we have to do is to implement it in a way that notification list item is updated using SPServices UpdateListItems operation.

Here is our MarkAsRead function which only takes notification ID as input parameter. I’m capturing all script structure so you can see where this function sits. Basically it’s right out of document-ready function scope, at the global level of entire javascript.

Now we have the ‘MarkAsRead’ function ready, all we have to do is to add the code snippet to call it. You can include this right below where we constructed the html for notification messages as shown below.

…and we are done!!! it’s time to test it now..

5. Test your first SPNotifications

To test it, drop a CEWP to your homepage and provide the link SPNotifications script in CEWP options. For example, you can upload the script to Shared Documents, just for testing purposes.

In my Notifications list, i created 3 entries having them assigned to myself and their status being ‘Unread’. Visiting my homepage, I see the following.

After 5 seconds, notifications header ‘Your messages for today’ will disappear. Note that in jGrowl options, I set sticky to true.

Now let’s say, I read the ‘Parking Lot Closed’ notification and clicked that little ‘X’ button. This will trigger close callback function and status for that notification will be set to ‘Read’, i.e. that notification will be marked as read. You can check it from Notifications list as shown below.

Now, let’s visit our homepage again and see only 2 unread notifications are left instead of 3 notifications.

That concludes this article – jGrowl Notifications for SharePoint 2010 – Part 2.

Now I have to think a better way to store and populate those notifications from power user or admin perspective.

Thanks for reading. If you have any suggestions, feedback, having trouble to implement; feel free to drop a note.


zieglers

Posted in IT Stuff, SharePoint, SharePoint 2010 | Tagged: , , , , , , , | 2 Comments »

jGrowl Notifications for SharePoint 2010 – Part 1

Posted by zieglers on July 28, 2011

Once I again I start an article with a sentence like “Recently a client needed this, needed that…”. This one is not any different from previous posts’ start-up, intro, motivation …etc. paragraphs. Yes, once again a client needed a alert box, or notification box type of functionality for their SharePoint 2010 homepage. While gathering requirements in client meetings, i just remembered Jan Tielen’s article about using jGrowl to display notifications in SharePoint 2007. So, I thought ‘Why not make it work for SharePoint 2010?’. That’s basically the motivation for this article. Let’s get jGrowl work for SharePoint 2010 first!!! Customizations and nice-to-have features will probably be explained in following articles of this series.

Well, our first questions is “How do I integrate jQuery with SharePoint 2010?” They are many articles written on that, so I won’t be explaining the details of that. Instead I can suggest you to follow masterpage update approach and include your jquery script references in masterpage rather than keeping those files in Shared Documents or some other library in your site. Basically I followed this article.

You start reading that article and ready to customize your masterpage using SharePoint Designer 2010. But now you need the jQuery lib and jGrowl files. You can get the current release of jQuery here. For this article I used version 1.6.2. Also you can download jGrowl and CSS file package from Jan’s article or here. If you want the latest jGrowl lib, then you can get it from jGrowl site.

I created a folder called jQuery in 14 hive and put jQuery and jGrowl files in there. It’s really up to you where you want to store your jQuery related lib files.

So far, it was getting the grounds ready. After you modify your masterpage, it should look like this.

Since in this article I keep the same scenario as explained in Jan’s article, we’ll see notifications for open tasks assigned to your user.

Now go ahead, switch to your site, possibly (but not restricted to ) a team site, and create some sample tasks as shown below.

Next, create a test page and insert a Content Editor Web Part in it.

Then, insert the code provided here. This part of the code is the same with the one Jan provided in his article with the exception of two minor changes.

1. L_Menu_BaseUrl is added while calling lists.asmx web service as highlighted in red below.

2. jQuery and jGrowl references are moved from CEWP to masterpage.

====================================================================

Testing jGrowl for SharePoint 2010…<br/>

<script language=”JavaScript”>

$(document).ready(function() {
var soapEnv =
“<soapenv:Envelope xmlns:soapenv=’http://schemas.xmlsoap.org/soap/envelope/’&gt; \
<soapenv:Body> \
<GetListItems xmlns=’http://schemas.microsoft.com/sharepoint/soap/’&gt; \
<listName>Tasks</listName> \
<viewFields> \
<ViewFields> \
<FieldRef Name=’Title’ /> \
<FieldRef Name=’Body’ /> \
</ViewFields> \
</viewFields> \
<query> \
<Query><Where> \
<And> \
<Eq> \
<FieldRef Name=’AssignedTo’ /> \
<Value Type=’Integer’><UserID Type=’Integer’ /></Value> \
</Eq> \
<Neq> \
<FieldRef Name=’Status’ /> \
<Value Type=’Choice’>Completed</Value> \
</Neq> \
</And> \
</Where> \
</Query>\
</query> \
</GetListItems> \
</soapenv:Body> \
</soapenv:Envelope>”;

$.ajax({
url: L_Menu_BaseUrl + “/_vti_bin/lists.asmx”,
type: “POST”,
dataType: “xml”,
data: soapEnv,
complete: processResult,
contentType: “text/xml; charset=\”utf-8\””
});
});

function processResult(xData, status) {
$.jGrowl.defaults.position = “bottom-right”;
$.jGrowl.defaults.life = 10000;

var firstMessage = true;

$(xData.responseXML).find(“z\\:row”).each(function() {
if(firstMessage)
{
firstMessage = false;
$.jGrowl(“<div class=’ms-vb’><b>You have open tasks on this site.</b><div>”,
{
life: 5000
}
);
}

var messageHtml =
“<div class=’ms-vb’>” +
“<a href='” + L_Menu_BaseUrl + “/Lists/Tasks/DispForm.aspx?ID=” + $(this).attr(“ows_ID”)
+ “&Source=” + window.location + “‘>” +
“<img src=’/_layouts/images/ITTASK.GIF’ border=’0′ align=’middle’> ” +
$(this).attr(“ows_Title”) + “</a>” +
“<br/>” + $(this).attr(“ows_Body”) +
“</div>”;
$.jGrowl(messageHtml);
});
}</script>

====================================================================

Refresh your page and there you go.. Your jGrowl notifications for SharePoint 2010. 🙂

Hope you enjoyed reading this article.

zieglers

Posted in IT Stuff, SharePoint, SharePoint 2010 | 3 Comments »

Tabbed Web Part for SharePoint

Posted by zieglers on July 20, 2011

Recently I was looking for a tabbed web part for a client project and I came up to this interesting one. It’s called EasyTabs, and really it’s very easy to use. Just a CEWP and a script. You are good to go. Two thumbs up for this one.

zieglers 


Posted in IT Stuff, SharePoint, SharePoint 2010 | Leave a Comment »

Microsoft MVP Award

Posted by zieglers on July 5, 2011

Last Canada Day (July 1st) was the best ever for me.

Firstly of all my son started walking… 🙂

Secondly, I was given 2011 Microsoft MVP Award – SharePoint Server. 🙂

Thanks a million to all my readers.

Best,

Zieglers

Posted in IT Stuff, SharePoint | Leave a Comment »

How to create Cascading Dropdowns for SharePoint 2010 using InfoPath

Posted by zieglers on May 9, 2011

Couple of weeks ago, I had to do some form customizations for a client SharePoint 2010 PoC. Due to time limitations I had no chance to do any coding, which lead to find the solutions using customizations only.

One of those customizations which took some time to figure out was to create Cascading Dropdowns for SharePoint 2010 lists. At first, It really sounds like simple, however as requirements get more complex, it really gets though to get the job done w/o any coding.

In this post, i’ll try to share some of my findings on creating cascading dropdowns. As for our demo scenario, we have a custom list to hold some Assets. However, we want to include some extra filters to see our company assets, such as office, asset location, …etc. This means first user will select office – New York, Boston, Toronto, … – and then location for the asset such as first floor, second floor, …etc. Based on those selections, assets falling into that criteria will be listed. Classic scenario..!!! Here is how you do this by customizing your New/Edit forms using InfoPath 2010 in SharePoint 2010.

You can find all screens of this process in the following presentation:

CascadingDropDowns

1. Now, let’s get started. Here is our initial New Form.

2.In the ribbon menu, click ‘Customiza Form’ button. This will open up InfoPath 2010.

3. Insert couple of rows for additional filter fields – Office and Location.

4. Add new fields to filter based on Office and Location.


5. Drag and drop Office and Location fields onto the form, where you created additional rows.

6. Change text boxes to drop downs.

7. So far, we created necessary UI elements and fields to hold filter values. Now add a data connection to fill those drop downs.


8. Data bind Office field to new data source.


9. Data bind Location field to new data source.


10. Having our fields data-bound, so far we have additional Office and Location fields on the form which are being loaded w/o any filter applied.

Now we come to fun part of this post. “How to filter Location values based on Office selection?”

Since we will apply on Location drop down, go to Location drop down properties and start applying filter as shown in below screens.


Add a new filter for Location field.

Specify filter condition. Usually this is the part things get confusing. But it’s not confusing at all.

Just speak the condition out loud:

“Filter condition is… Filter Location based on Office value… Which Office value???…”

“Filter Location where Office value coming from data source is equal to Office value coming from UI Office drop down…”

11. Now click Ok to close all windows. Our cascading dropdowns are ready! Preview changes we’ve made.

Select ‘New York’ as Office.

Location values for New York office is shown!!!

Now that concludes this post. Another addition to this can be setting some field values in UI based on drop down selections. For this you need to add a rule which has an action item attached to it. I’ll try to show that one in another post.

zieglers

Posted in IT Stuff, SharePoint, SharePoint 2010 | Tagged: , , , , , , | Leave a Comment »